The Beachcomber Cocktail

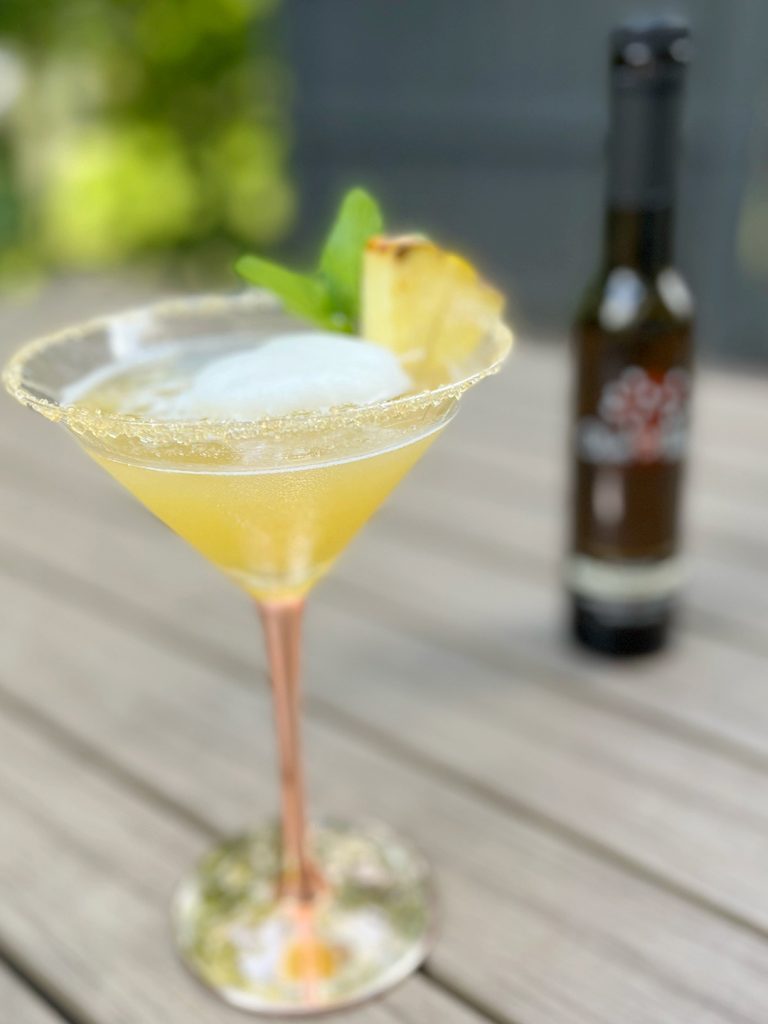
This tart but sweet vodka martini cocktail will have you enjoying these last days of summer. The perfectly infused white balsamic takes the iconic flavor of coconut and mixes it with tropical flavors, transporting you to your own private island! It complements the pineapple like a dream and the brandy makes it so sophisticated and balanced. The addition of whipped egg whites gives it a mysterious froth and softens all the flavors. Drink it with your feet up!

INGREDIENTS

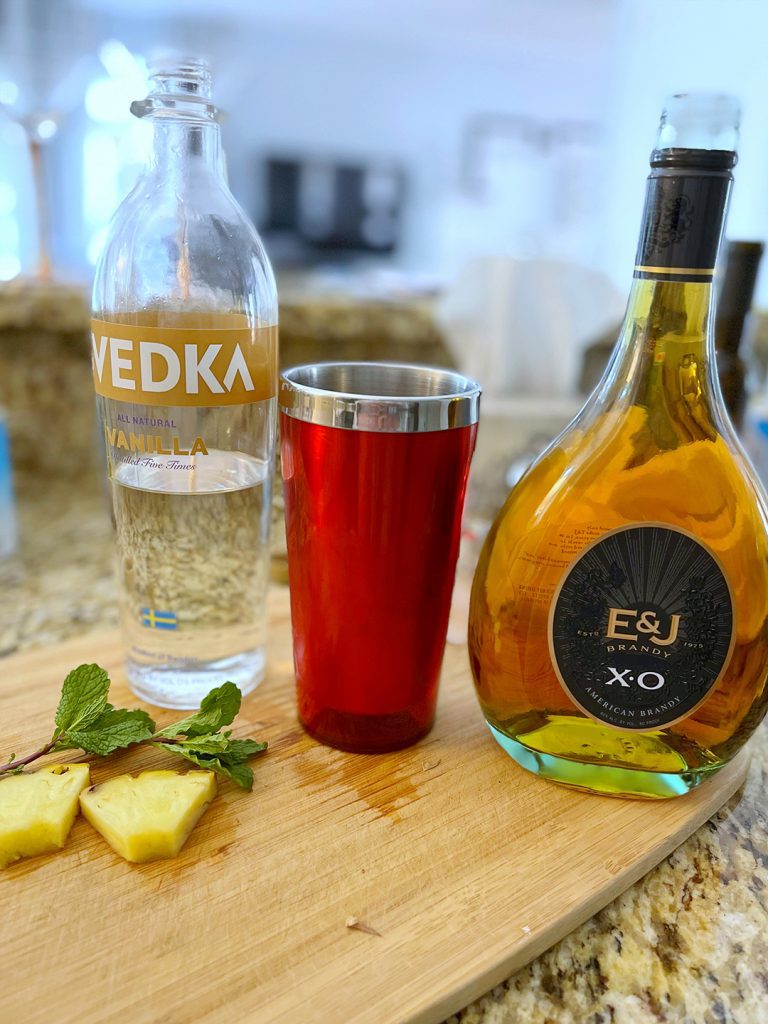
  • 3 ounces vanilla flavored vodka (I like Svedka)
  • 1 ounce of good Brandy
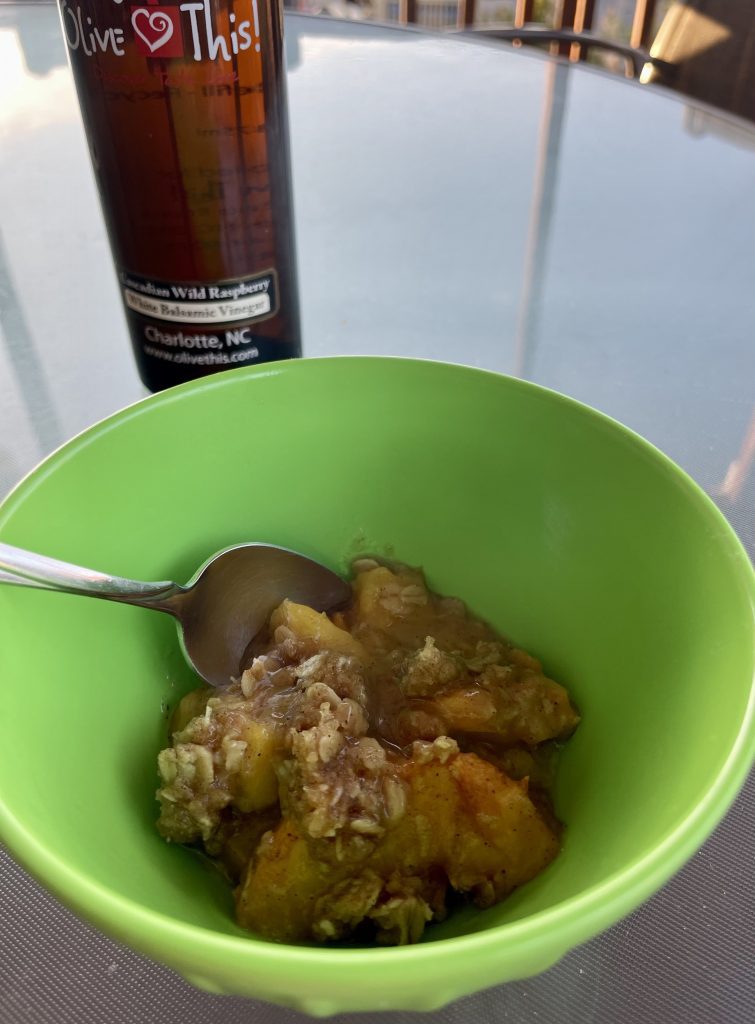
  • 1 ounce of Olive This! Coconut White Balsamic Vinegar
  • 2 ounces pineapple juice
  • 1 egg white whipped
  • Sections of fresh pineapple
  • few mint leaves to garnish
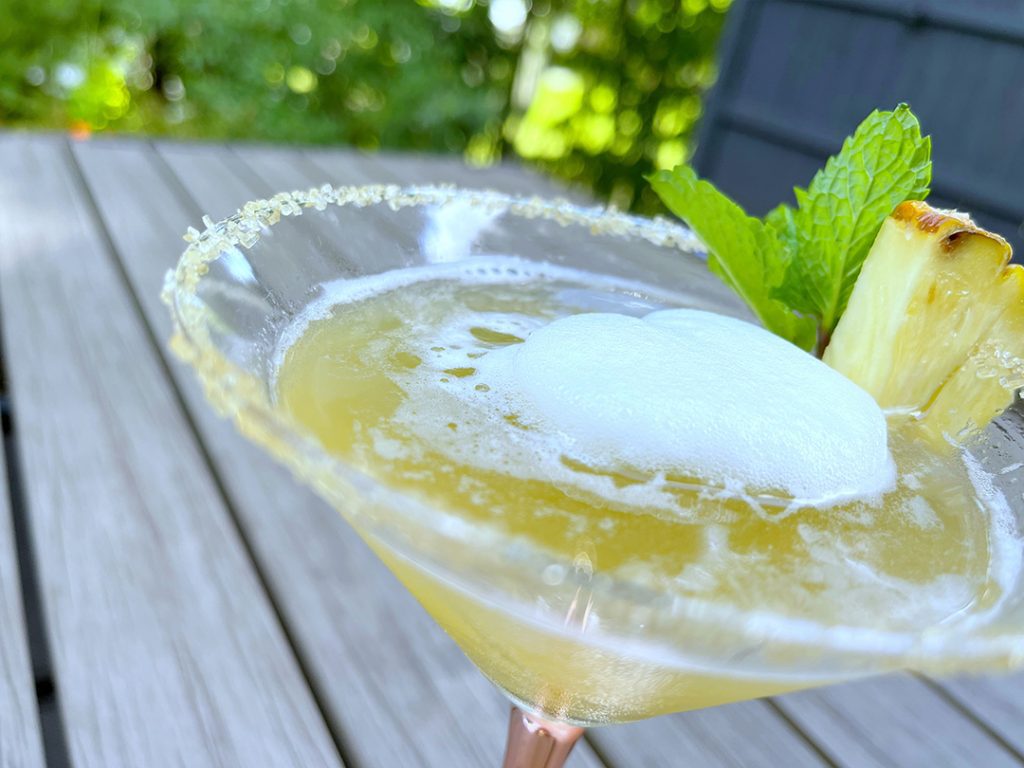
  • raw sugar for the rim of the glass

DIRECTIONS

Rub a bit of the fresh pineapple around the rim of each glass and dip in the raw sugar. Set aside.

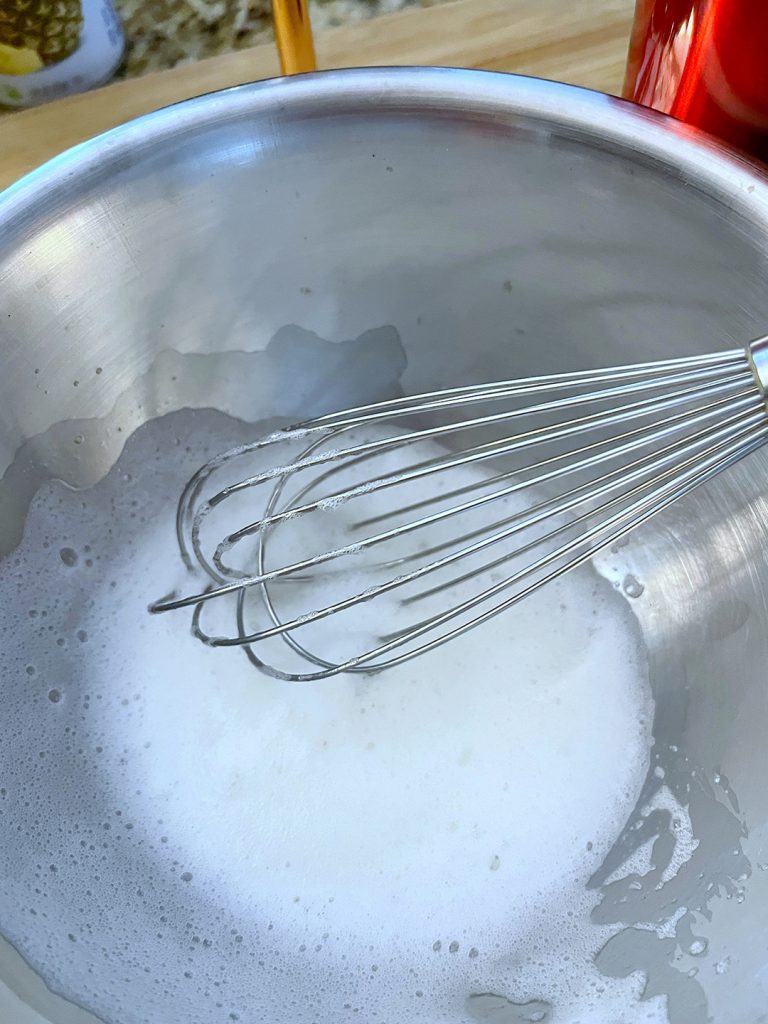
Separate the egg white from the yolk, (which you can keep or discard,) and place the egg white in a cool metal bowl. I like to whip the egg white myself. You can use a mixer but it’s so much trouble for something you can do with your hand and a deep breath in the space of about 3 minutes. It’s good exercise and you don’t want the egg to be stiff peaks. Get your wrist into it and whip until very foamy.

In a large cocktail shaker filled with ice, add vodka, brandy, balsamic, and pineapple juice. Shake well for about 15-20 seconds. Remove cap and ladle in the egg whites. Replace the cap and shake for about 10 more seconds. Alternately, you can simply ladle a pillowy cloud of the egg whites on top of the martini if you don’t want to shake it into the mixture.

Serve while wearing sunglasses!

©Photo and Recipes by Copyright, Camine Pappas, 2013 – 2022

Have a comment? We’d love to hear from you. Have you tried this dish? Do you have a variation that you think others will enjoy? Leave us a comment below.

Herbs de Provence, Heirloom Tomato, Orange and Italian Ham Bruschetta

Herbs de Provence, heirloom tomato, orange and Italian ham bruschetta

Slice, blend, toast, slather, drool! These quick and easy appetizers bring an exotic twist to the familiar tomato bruschetta. Orange and Herbs de Provence flavors marry beautifully. Buy heirloom tomatoes if you can find them. The colors make for extra wow. And these keep in the fridge for a few hours before guests arrive. Ensuring your kitchen is spotless and this recipe is the spotlight! 

INGREDIENTS

  • 1 half French baguette cut into 8 ½” slices
  • ­1 – 3 oz. package Speck Italian Ham (at ALDI) or buy soft prosciutto
  • 1 – 4 oz. package honey goat cheese
  • ¼ cup Olive This! Herbs de Provence Olive Oil + 1 tablespoon
  • 2 navel oranges (Need the zest, flesh, and juice)
  • 1 pint, or 1 heaping cup diced of heirloom cherry tomatoes
  • ¼ cup finely chopped Italian flat leaf parsley
  • ½ tablespoon kosher salt
  • ¼ tablespoon black pepper

DIRECTIONS

Goat cheese mixture

In a small bowl combine the zest of one orange and the goat cheese. Let it reach room temperature. Combine well. Set aside.

let cherry tomatoes and oranges sit after mixed

In a larger glass bowl, assemble the following: Take the orange you zested and cut off the peel, revealing only the flesh without any pith. Slice and then cut into small pieces. Cut the peel off the other orange and use a little more than half of the flesh cut into small chunks. Then use the remainder of the orange to squeeze out 1 – 2 tablespoons of the fresh juice. Cut the cherry tomatoes into quarters. Not too tiny but so that the orange pieces and tomatoes are the same size. Add the finely chopped parsley. Add the salt and pepper, and finally the Tbsp of Herbs de Provence oil. Mix well and set aside.

Brushing olive oil on bread

Place the 8 slices of bread on a baking sheet and broil the first side until lightly toasted. Remove, turn over the bread, and take the ¼ cup of oil and brush it generously on the untoasted side. Return to broiler and toast until a lovely brown and the oil is bubbling!

Image of how assembled tomato bruschetta should look

To assemble the tomato bruschettas, slather 1/8th of the orange goat cheese on each toast, oil side up. Then a generous spoonful of the tomato, orange, and parsley mixture. Top with an artfully scrunched piece of the speck ham. Drizzle with a little more of the oil, and a light dusting of black pepper.

Serve. Can cover and refrigerate for about 2 hours. After than the bread becomes too soggy.

Closeup image of bruschetta

NOTE: You can leave the ham off and serve without a meat. These also work well topped with roasted chicken or sliced cold roast beef for a truly elegant plate!

Heirloom Tomato Bruschetta

©Photo and Recipes by Copyright, Camine Pappas, 2013 – 2022

Have a comment? We’d love to hear from you. Have you tried this dish? Do you have a variation that you think others will enjoy? Leave us a comment below.

Peach Crumble with Cascadian Wild Raspberry Balsamic

It’s peach season! Everyone needs a great peach pie recipe to showcase the beautiful harvest of peaches. This recipe is that. The crumbly streusel like topping complements the fresh peaches that have been tossed in Cascadian Wild Raspberry Balsamic. Another great balsamic for the peaches is Cinnamon Pear Dark Balsamic.

To peel or not to peel. Peeling the peaches is completely up to your personal preference. Most people do not like the fuzzy peach skin and therefore most recipes involve peeling. There are also a few ways to peel. The most effective but still time consuming is to drop whole peaches into a pot of boiling water for a minute. When you pull them out the skins will shrink a little and it will be easier to pull off the skins. But if this is too much work, then use a knife and cut the skins off.

Ingredients

Topping:

  • 1/2 cup flour
  • 1/4 cup old fashioned oats
  • 1/2 cup light brown sugar
  • 1/2 teaspoon cinnamon
  • 1/4 teaspoon ground nutmeg
  • 1 teaspoons salt
  • 1/2 cup cold butter, cut into 1/2 inch pieces

Filling:

Directions

Preheat oven to 350 degrees.

Mix cornstarch, balsamic vinegar, vanilla, cinnamon and salt in large bowl. Pour over sliced peaches and toss to coat. Let stand at room temp while you prepare the topping.

While the peaches are resting, make the topping. In a medium-sized bowl, stir together the brown sugar, flour, oats, cinnamon, nutmeg, and salt until combined. Using your hands or a pastry cutter, work the cold butter into the mixture until it resembles clumpy sand and is all incorporated. All pieces of butter should be about the size of a pea or less. Place this in the fridge until you are ready to assemble the crisp.

Pour the peach mixture into a baking dish. Sprinkle the topping over the peaches. Bake for 40-50 minutes until bubbly and golden brown on top. Let stand for at least 15 minutes before serving.

Enjoy alone or with a scoop of ice cream.

Note: I used a 9×13 dish but a 9×9 or truly almost any size would work. Just adjust the cooking time as necessary.

Options – Add about a 1/2 cup chopped pecans to the crumb topping to add a crunch. Reduce the amount of oats to 1/4 cup.

Have a comment? We’d love to hear from you. Have you tried this dish? Do you have a variation that you think others will enjoy? Leave us a comment below.

Twisted Artichoke and Sundried Tomato Puff Pastry Wheels

Imagination isn’t always the first step to genius in the kitchen. This was the result of a happy accident. I intended to make a kind of bread stick, but the soft elements would fall away from the stick. So, after I had twisted the lengths of stuffed pastry, I rolled them into wheels. Of course, if anyone asks, you tell them this was my intention all along. The second step to genius is to take all the credit!

Ingredients

  • 1 package puff pastry thawed (Note that there are two sheets per package)
  • 3 1/2 oz container herbed goat cheese spread (I used Alouette®)
  • 1/3 cup sundried tomatoes in oil, drained & chopped
  • 6 oz can of artichoke hearts drained & chopped
  • Large handful of fresh basil, julienned
  • 1 egg beaten
  • Flour to dust working surface
  • Salted butter to grease sheet pan
  • Olive This! Black Mission Fig Balsamic, about 3 tablespoons

Directions

Get out a large baking sheet and lightly rub surface with butter. Roll out each sheet to about 10 inches by 13 on a floured surface.

On the first sheet, take a spatula and spread about ¾ of the container of herbed cheese all over the pastry sheet. You can use more if you’d like; but if the sheets are stuffed too much, it is hard to roll them. Now, sprinkle on the chopped sundried tomatoes, the artichoke hearts, and half the basil. Drizzle black mission fig balsamic vinegar over top, about 2-3 tablespoons.

Fit the other sheet on top, trying to match the edges as best you can. Now slice vertically into 1 to 1 1/2 inch strips, which results in about 11-13 evenly spaced strips. Pick up each strip and begin to carefully twirl them, like you would if you were twirling streamers or bread sticks. Make sure you keep filling intact.

Roll each strip into a circle, like the photo above, so they’re all twisty and fun! Arrange on baking sheet. Chill for 15 minutes.

Preheat oven to 425 degrees F while wheels are chilling. Remove from fridge, and brush with the egg wash. Note that chilling is an important step. A cold puff pastry product will cook better and not puff out all wild. You want pretty twisties, not exploded ones! Bake for about 25 minutes until browned.

Serve warm, and garnish with more basil if desired!

If you enjoyed this recipe, check out more of Camine’s Cuisine Bling recipes in her cookbook! This recipe can be found on page 27. Click her to purchase the book.

©Photo and Recipes Copyright, Camine Pappas, 2013 – 2022

Have a comment? We’d love to hear from you. Have you tried this dish? Do you have a variation that you think others will enjoy? Leave us a comment below.

Bacon Wrapped Apples and Chicken Tenders

Don’t let anything go on a plate that isn’t gorgeous. Even chicken tenders can become a work of art in this simple and flavorful baked chicken recipe.

INGREDIENTS:

  • 8 boneless chicken tenders, about 3 ounces each tender
  • 4 strips sturdy thick cut bacon
  • 1 Fuji apple cut into 8 thick slices (Can also use Granny Smith)
  • Half a large white onion cut into long thick pieces
  • 1 teaspoon kosher salt
  • 1/4 cup chopped fresh Italian flat leaf parsley
  • A bit of Olive This! Single Varietal Olive Oil to moisten bottom on baking dish
  • 2 tablespoons chopped Italian flat leaf parsley
  • ¼ cup sliced almonds for garnish

DRESSING:

INSTRUCTIONS:

Prepare all ingredients to have them ready to assemble into bundles. Preheat oven to 375° F.

Cut the apple and onion and lay out the four bacon slices on a cutting board. Place two of the tenders down and flank them with 2 slices onion and 2 slices of the apple. Sprinkle with a little bit of the salt. Wrap the bacon around all and seal tightly with the edges of the sticky bacon.

Set seam side down in a lightly oiled baking dish. Repeat for three other bundles. Mix all the dressing ingredients in a separate bowl. Whisk until well blended. Brush generously on the wrapped chicken bundles. There should be enough for all four servings with no dressing remaining. Sprinkle with a little parsley and reserve some parsley for garnishing.

Roast in oven for 20 minutes or until chicken is done. Be careful not to overcook, as tenders usually cook quickly.

Serve with mashed sweet potatoes and garnish with almonds.

©Recipe and Photo Copyright Camine Pappas, 2022. All rights reserved.

Have a comment? We’d love to hear from you. Have you tried this dish? Do you have a variation that you think others will enjoy? Leave us a comment below.

Strawberry Yogurt Toast

This TikTok viral recipe definitely lived up to the hype. It’s an easy, yet fancy looking breakfast you can quickly whip up for guests or just yourself any day of the week. We of course added our Olive This! twist by subbing out the sugar normally seen in these recipes for natural sweeten, flavored balsamic vinegar. It not only lets you skip the processed sugar but also adds an extra flavor hint.

The best part of yogurt toast is how versatile this recipe is. We have used Strawberry Balsamic to highlight the fresh strawberries but truly any naturally flavored balsamic would be great. We particularly enjoy it with the berry or fruit flavored dark balsamics but even the white balsamics are quite nice. And to top the toast feel free to use any favorite fruit sliced thinly. I am especially looking forward to peach season to top it with thin, juicy peach slices

Ingredients

Directions

Mix the egg and yogurt together. Next add the balsamic and sprinkle of cinnamon to the mixture. Prepare the bread by pushing down the center to create a bit of a well. Then spread the yogurt mixture on the bread, dividing the mixture between the 4 slices. The mixture should be thick on the bread but not excessive. Slice up the strawberries and arrange them on top of the bread.

Place in the air fryer at 400 degrees for 12-15 minutes. If you do not have an air fryer you could bake it in an oven, preferably on convection back if you have that option, for 15-20 minutes at 400 degrees. As soon as you take it out of the air fryer sprinkle with a little bit of finishing salt. I used a lemon flake and it was fantastic, so was the sweet Hawaiian salt. Even a few sprinkles of gray salt is fantastic to enhance the sweetness of this strawberry yogurt toast.

Enjoy!

Have a comment? We’d love to hear from you. Have you tried this dish? Do you have a variation that you think others will enjoy? Leave us a comment below.

Chipotle and Espresso Balsamic Marinated Pork Loin & Tomato Sauté

with Cheesy Orzo and Asparagus

You will not believe how intensely flavorful this entrée is. I’m pretty sure it is the BEST pork dish I’ve ever created or eaten! Don’t be put off by the word Espresso. This isn’t the base for your morning caramel macchiato latte. The coffee is a bean, and when roasted and blended with balsamic it becomes a culinary tool to intensify almost every meat dish imaginable. It pairs with the Adobo, lime, and garlic like Fred and Ginger are paired on the dance floor. Made. For. Each. Other.

Recipe Credit: Camine Pappas. To read more about how Camine created this recipe and read the entire blog post, click here to visit her websiteIFeelLikeCooking.com.

INGREDIENTS:

  • 1 ½ lbs. pork tenderloin sliced thinly
  • ¼ cup + 2 teaspoons Olive This! Espresso Balsamic Vinegar
  • 2 tablespoons Olive This! Harissa Olive Oil
  • ¼ cup coarsely chopped chipotle in adobo sauce
  • 1 ½ teaspoons grated gingerroot
  • 1 ½ teaspoons grated fresh garlic
  • 1 teaspoon fresh thyme leaves
  • ½ lime cut into chunks
  • ½ teaspoon cumin powder
  • ½ teaspoon paprika
  • 1 ½ teaspoons kosher salt
  • ½ teaspoon black pepper
  • 2 tablespoons of a mild Olive This! Single Varietal Olive Oil
  • 1 ½ cups tomatoes cut into 1-inch chunks
  • 3 slices of red onion  
  • 2 tablespoons chopped fresh cilantro

Directions

Slice the tomatoes, chop the cilantro, and slice the red onion. Set aside.

Clean and trim the pork tenderloin and cut into very thin slices and set aside.

In a large glass bowl add the harissa oil, espresso balsamic, grated ginger, grated garlic, chipotle in adobo, thyme, lime, salt, pepper, cumin, and paprika. Add the sliced pork to the marinade and stir well. Let it marinate for at least an hour.

If you put it in the fridge, be sure to set it on the counter for at least 30 minutes so the meat reaches room temperature before proceeding.

Add the 2 tablespoons of olive oil to a preheated and very hot pan. Add the pork and all the marinade to the pan. Add the tomatoes and the cilantro. Then sauté until the pork is cooked through. About 5-6 minutes. Turn often. When the pork is done serve atop the orzo surrounded by blanched asparagus and top with the red onion and a flourish of the remaining cilantro.

For the cheesy orzo:  Boil ¾ cup orzo in 4 cups boiling water until soft. Drain. Then add ¾ cup grated English cheddar, ¼ cup half-n-half cream, 2 tablespoons salted butter, 1 teaspoon kosher salt and a dash of black pepper. Stir, cover, and keep warm until ready to serve.

©Recipe and Photo Copyright Camine Pappas, 2013-2022. All rights reserved. 

Have a comment? We’d love to hear from you. Have you tried this dish? Do you have a variation that you think others will enjoy? Leave us a comment below.

Roasted Red Pepper & Chicken Cavatappi in a Smoked Gouda Sauce

The word cavatappi literally means corkscrew. It is perfect for catching all that smoked olive wood olive oil cheesy sauce goodness. Layering all the smoky elements makes for an intense depth of flavor that is sweet and rich. Then, prepping all ingredients in advance and utilizing just a couple of pans on the stove is all it takes to make this beautiful meal. Always use heavy cream or half ‘n half to make the cheese sauce. Milk is really no substitute for the richness this deserves!

INGREDIENTS

  • ½ cup Olive This! Olive Wood Smoked Olive Oil, divided
  • 3 cups shredded roast chicken, white and dark meat OR use a rotisseries chicken
  • 1 large red pepper cut into strips
  • 3 medium garlic cloves, finely chopped
  • ¾ cup pitted Kalamata olives, halved
  • ¾ cup chopped Italian flat leaf parsley
  • ¼ cup scallions sliced thin, including white and green parts
  • 8-ounce round of good qualify smoked Gouda cheese, grated
  • 3 cups of uncooked cavatappi pasta
  • 2 ¼ cups heavy cream or half ‘n half
  • 4 tablespoons all-purpose flour
  • 4 tablespoons unsalted butter
  • 1 to 2 teaspoons kosher salt
  • ½ teaspoon black pepper

DIRECTIONS

Preheat your oven to 425° F and line a small glass baking dish with parchment paper. Place the strips of red pepper in the dish and drizzle with about 3 tablespoons of the olive wood smoked olive oil. Roast for about 25 minutes or until they’re soft and charred on the edges. Remove and cut into smaller pieces. Set aside.

Bring a large pot of water to a rolling boil with about 2 t of kosher salt. When you’re about 15 minutes from service, add the pasta and let it boil while you are cooking the other ingredients as described in the next paragraph*, timing it so that the cavatappi is soft, but not mushy. This takes about 12-15 minutes. Check your pasta at 10 minutes. It should be a bit beyond al dente which means it still has a little body, but no hardness when you chew it. Keep cooking until it is perfect. Drain and add to the skillet with your chicken mixture.

Measure out the shredded chicken, the halved Kalamata olives, the chopped parsley, and the chopped garlic. Have it ready along with the grated Gouda cheese, and the pre-measured cream. Add about 2 tablespoons smoked olive oil to a high sided and large saucepan and heat to high. When hot add the roasted red pepper and the garlic. Stir for just a couple of minutes until the garlic is fragrant. Add the kalamata olives, and the chicken. Heat through until hot, about a minute or so. Remove and put in a glass bowl and cover with foil to keep warm. Wipe out the pan with a paper towel and add the butter and flour. Melt and whisk together cooking for about 2 minutes or so to create a roux.

Then pull off the burner and add about ½ cup of the cream and whisk in immediately until it is smooth and pasty. Now add another ½ cup of the cream and whisk again until smooth. Next add the rest of the cream, about 1 teaspoon kosher salt and ¼ teaspoon black pepper. Mix well. Keep heat on medium and whisk until smooth and a loose creamy consistency. The entire cheese sauce part takes about 4 minutes. Remember, you don’t want your cheese sauce PASTY. If it gets too thick just patiently whisk in a little more cream. Then add the drained pasta, the chicken, kalamata, and red pepper mixture, the parsley, and stir on medium low until hot through. Serve with a sprig of parsley! Take a taste and if more salt is needed don’t be afraid to add.

*Make sure you don’t overcook the pasta or let sit in the water when it is done. It should finish just as you’re finishing the cheese sauce, so everything comes together in a nice creamy way and not pasty.

For more photos and narrative, visit my blog at ifeellikecooking.com

©Recipe and Photo Copyright Camine Pappas, 2013-2022. All rights reserved.

Have a comment? We’d love to hear from you. Have you tried this dish? Do you have a variation that you think others will enjoy? Leave us a comment below.

Marinated Pork & Pear Stir Fry with Cashews

Many folks don’t know that cinnamon is a hot spice. Which makes it a logical choice for Asian dishes. Especially with things like pork or chicken. By utilizing of pre-made ingredients like canned pears, hoisin sauce, cinnamon pear balsamic vinegar and crunchy cashews, you’ll find yourself at the starting gate of deliciousness as you whip up a stir-fry full of interest and surprise.

Recipe Credit: Camine Pappas. To read more about how Camine created this recipe and read the entire blog post, click here to visit her websiteIFeelLikeCooking.com.

INGREDIENTS

  • 10 ounces lean pork tenderloin sliced into thin strips and marinated for 3 hours
    (I used 2 thick cut pork loin filets)
  • 3 cups cooked jasmine rice
  • 1/3 cup cashew pieces
  • 2 large celery stalks, sliced
  • 3/4 cup canned pears, drained and cut into chunks
  • 1 teaspoon chili flakes or more if preferred
  • 1 tablespoon fresh grated ginger
  • Handful chopped fresh parsley
  • Chopped cilantro and scallions for garnish
  • ½ teaspoon salt
  • ¼ teaspoon black pepper
  • 2 tablespoons Olive This! Single Varietal Olive Oil
  • 3-4 tablespoons Hoisin sauce

    Marinade:

DIRECTIONS

You can use any pork but pork loin is the best as the more tender the meat the better this dish. Place thin strips of pork in a wide shallow bowl and add all the marinade ingredients. Stir very well. Cover and refrigerate for 3 hours turning the pork often in the marinade.

While the rice is cooking heat a medium sized saucepan to very hot and add olive oil. Add the celery, chili flakes, and stir for a minute. Now add the pork and all the marinade, as well as the chopped ginger. Stir and cook for only a minute or two. The very thin pork cooks fast! Add the salt and pepper, the pears, and stir a bit more to incorporate. Then add the hoisin ­sauce and about 2 tablespoons of the chopped parsley. Stir.

Serve over rice and garnish with more parsley, or you can garnish with cilantro, or even scallions.


 ©Recipe and Photo Copyright Camine Pappas, 2020. All rights reserved.

Have a comment? We’d love to hear from you. Have you tried this dish? Do you have a variation that you think others will enjoy? Leave us a comment below.

Serrano Honey Blueberry Tartlets

With Lemon Custard & a Chocolate Drizzle

Unceremoniously delicious and so easy. The spicy bite of the hot serrano honey makes an interesting compliment to the sweetness of the blueberry mixture. An elegant and elevated fruit dessert for your next soirée!

Recipe Credit: Camine Pappas. To read more about how Camine created this recipe and read the entire blog post, click here to visit her websiteIFeelLikeCooking.com.

Serves 6

INGREDIENTS

Blueberry mixture:

Puff Pastry:

  • Two thirds of 1 whole sheet of puff pastry (I used Pepperidge Farm brand)

Lemon Custard:

  • 7 ounces Greek yogurt
  • 3 tablespoons lemon curd
  • 2 tablespoons granulated sugar

DIRECTIONS

Combine blueberries, honey, brandy, sugar, and vanilla in a small saucepan. Bring to boil, then reduce heat so it’s still bubbling but not too violently. Let cook, stirring often, for about 8-9 minutes. Remove from heat, place in a heat-safe glass dish and set aside. Let cool before serving. It will thicken slightly.

In another bowl, combine the yogurt, lemon curd, and sugar. Mix well with a whisk, and cover and refrigerate for at least an hour for all the sugar granules to completely dissolve.

Using a rolling pin, roll out the thawed pastry square to about 11” by 11”. Then cut into 6 squares. Roll out each square to about twice the size or about 5” by 5”. Make sure the pastry is nice and thin.

Place each of the squares inside the opening of a regular sized muffin tin that has been slightly buttered inside. Tuck the dough in carefully and flute the edges a bit so it looks like a flower. Place in freezer for about 4 minutes to completely chill the dough right before you pop it in the hot oven. It will help them puff better! Bake in a pre-heated 400° F oven for about 15 minutes or until very brown.

Remove them from oven and immediate create a more pronounced indent in the center by using the butt of the handle of an ice cream scoop. (It was just the right size!) Don’t push too hard, just create a well for placing the lemon custard and the blueberry mixture as the puff may have obliterated any indentation! Let cool for about 3 minutes. Then remove and place on a wire rack. Set aside until ready to assemble.

To plate, put about 3 tablespoons custard down first smearing it out. Place the puff pastry cup on the smear to secure it. Put another 2-3 tablespoons of custard in the cup. Then ladle the blueberry mixture on top and cascading down. Divide evenly among the 6 cups. Garnish as you wish.

©Photo and Recipes by Copyright, Camine Pappas, 2013 – 2022

Have a comment? We’d love to hear from you. Have you tried this dish? Do you have a variation that you think others will enjoy? Leave us a comment below.

Stay updated with the latest news from Olive This! - Sign up for our newsletter here.

Copyright 2021 - Olive This! - All rights reserved. Privacy Policy.
Site by Horde Marketing, LLC